Why Choose a Brake Caliper Rebuild Kit?

Time:2026-10-07 Author:Aria
0%

Choosing a Brake Caliper Rebuild Kit can restore braking performance without replacing an otherwise serviceable caliper. In workshop practice, the difference often appears during inspection: a torn dust boot, hardened piston seal, or sticky guide pin. These small faults can leave one brake pad wearing at an angle. They may also create heat around a single wheel.

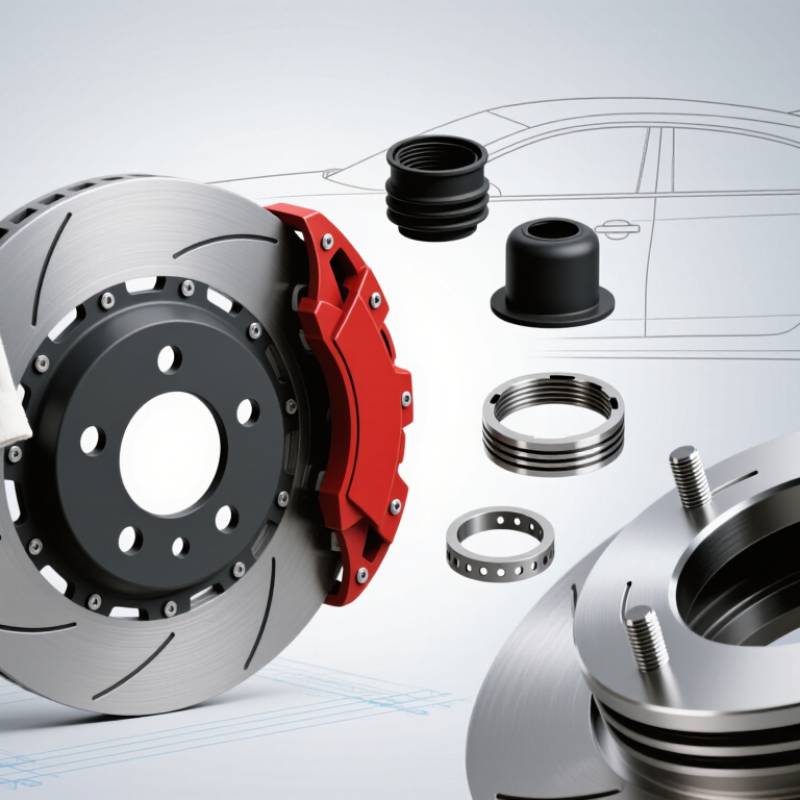
A quality Brake Caliper Rebuild Kit usually includes seals and protective boots for a specific caliper model. Some kits also provide guide-pin boots, retaining rings, or assembly lubricant. The exact contents vary, so the part number matters. Match the part. Confirm the piston diameter, caliper type, and vehicle application before ordering. This prevents an expensive and frustrating mistake.

A rebuild is practical when the bore remains smooth and the housing shows no serious corrosion. The caliper must be cleaned thoroughly, and every sealing surface should be checked under bright light. Inspect every surface. Brake fluid contamination, dirt, or a scratched piston can undermine careful work. Do not rush this step.

A rebuilt caliper is only as reliable as its inspection and installation. After assembly, the system needs proper bleeding, a leak check, and controlled brake testing. A rebuild kit is not magic. Replacement may be safer when corrosion has damaged the bore or threads. That judgment requires evidence, not optimism. Used correctly, a Brake Caliper Rebuild Kit can reduce waste, control repair costs, and restore smooth piston movement while revealing why the original caliper failed.
Why Choose a Brake Caliper Rebuild Kit?

Brake Caliper Rebuild Kits: Parts, Functions, and Service-Life Factors

Why Choose a Brake Caliper Rebuild Kit?

Brake Caliper Rebuild Kits: Parts, Functions, and Service-Life Factors

A brake caliper rebuild kit restores sealing and sliding performance without replacing the entire caliper. Typical parts include a square-cut piston seal, dust boot, retaining ring, guide-pin boots, and protective grease. The piston seal holds hydraulic pressure and helps retract the piston slightly after braking. The dust boot blocks water, grit, and road salt from reaching the piston surface.

Small parts matter.

During a rebuild, cleanliness is critical. A tiny rust flake inside the bore can damage a new seal. Mechanics should inspect the piston, bore, guide pins, and bleeder threads before installation. Brake fluid must remain uncontaminated. Correct lubrication also matters; ordinary grease may swell rubber components. In practice, the first diagnosis is sometimes wrong. A sticking caliper may result from a damaged hose, uneven pad wear, or a bent guide pin, not only a failed seal.

Tips: Replace questionable pistons instead of polishing deep corrosion. Use fresh brake fluid and bleed the system carefully. Check pad movement after assembly. Heat, moisture, winter salt, poor maintenance, and repeated hard braking shorten service life. A clean rebuild can last for years, but only when the underlying cause is corrected. I have seen carefully rebuilt calipers fail early because old guide pins were reused. That oversight is easy to miss.

Diagnosing Caliper Wear: Seal Failure, Piston Corrosion, and Brake Drag

Why Choose a Brake Caliper Rebuild Kit?

Diagnosing Caliper Wear: Seal Failure, Piston Corrosion, and Brake Drag

A brake caliper rebuild kit can restore reliable braking when the housing remains sound. It usually includes seals, dust boots, and retaining components. Small leaks matter. Brake fluid around the piston often signals a damaged pressure seal. A torn dust boot allows water and grit to enter the bore. I have seen clean-looking calipers hide severe corrosion beneath the boot.

Piston corrosion creates rough surfaces that damage new seals. Look for pitting, brown staining, or flaking metal. A light mark may seem harmless, but it can cause fluid leakage later. The caliper bore also requires careful inspection. If corrosion feels sharp under a fingertip, rebuilding may not be dependable. This is where a replacement caliper might be safer, although the final decision needs professional judgment.

Brake drag has practical warning signs. After a short drive, one wheel may feel unusually hot. The vehicle can pull slightly, and fuel use may increase. Sometimes, the brake pedal feels normal, making diagnosis easy to miss. Remove the wheel only with proper support, then check whether the piston retracts smoothly. Do not force a damaged piston back into place. I once underestimated a faint grinding sound; the rotor later showed clear heat spots. That mistake reinforced a basic lesson: inspect the seals, piston, bore, and slider movement together.

Why Choose a Brake Caliper Rebuild Kit? - Diagnosing Caliper Wear: Seal Failure, Piston Corrosion, and Brake Drag

Inspection Area Typical Finding Likely Cause Possible Brake Symptoms Risk Level Recommended Action Rebuild Kit Relevance
Caliper dust boot Torn, hardened, displaced, or missing boot Age, heat, road debris, incorrect installation, or mechanical damage Progressive piston corrosion, contaminated brake fluid, or uneven pad wear Medium Inspect the piston and bore; replace the boot and retaining components if the surfaces remain serviceable A rebuild kit commonly supplies a replacement dust boot and retaining ring
Hydraulic seal Brake fluid seepage, wetness, or a visibly damaged square-cut seal Seal aging, chemical contamination, overheating, incorrect fluid, or bore damage Low fluid level, soft pedal, reduced braking force, or external fluid loss High Do not return the vehicle to service until the leak is repaired, the system is filled with the specified fluid, and the brakes are bled The hydraulic piston seal is a primary rebuild-kit component
Piston surface Rust, pitting, scoring, flaking, or a rough sealing area Moisture entering through a damaged boot, contaminated fluid, or prolonged vehicle storage Seal damage, piston sticking, uneven braking, and recurring fluid leakage High Replace the piston if corrosion or scoring is located in the seal contact area; do not polish away deep pitting Many kits include seals and boots but do not automatically correct a damaged piston
Caliper bore Corrosion, grooves, cracks, or heavy deposits inside the bore Water contamination, abrasive debris, incorrect cleaning, or severe corrosion Persistent leakage, piston binding, uneven pad contact, or brake pull High Measure and inspect the bore according to the vehicle service procedure; replace the caliper if it is outside specification A seal kit is suitable only when the bore is clean, smooth, and serviceable
Caliper sliding pins Pins are seized, dry, bent, corroded, or difficult to move by hand Damaged pin boots, water ingress, incorrect lubricant, or accumulated corrosion Tapered pad wear, outer or inner pad wear, noise, and brake drag Medium to High Clean or replace the pins and boots; apply only the lubricant specified for the brake hardware Some rebuild kits include guide-pin boots, while others focus only on the piston seal set
Brake drag check Wheel remains difficult to rotate after the brake pedal is released Sticking piston, seized sliding hardware, restricted flexible hose, or parking-brake mechanism fault Heat buildup, burning odor, rapid pad wear, noise, reduced fuel economy, or vehicle pull High Compare wheel temperatures carefully, identify the hydraulic or mechanical cause, and repair before continued driving Replacing aged seals and boots can restore piston movement when the piston and bore are undamaged
Brake pad wear pattern One pad is substantially thinner, or wear is tapered across the pad Uneven caliper movement, seized guide pin, piston binding, or incorrect hardware installation Reduced braking consistency, noise, vibration, and shortened pad life Medium to High Find and correct the movement problem; inspect the rotor and replace pads as an axle set when required A rebuild kit may address internal seal wear but does not replace worn pads, rotors, or guide pins unless included
Brake fluid condition Dark or contaminated fluid, visible moisture, or debris near the caliper Normal fluid aging, water absorption, internal component deterioration, or poor service practices Corrosion of hydraulic components, poor pedal feel, seal damage, and reduced boiling resistance Medium to High Use the specified brake fluid, flush or replace it according to the service procedure, and remove air from the system New seals help prevent leakage but cannot compensate for contaminated fluid or corrosion elsewhere in the system
Rebuild suitability decision Caliper body is intact; bore is smooth; piston is free from sealing-area pitting Wear is limited to replaceable seals, boots, and service hardware A rebuild can restore sealing and normal piston retraction when all parts meet specifications Suitable after inspection Disassemble, clean with approved methods, replace all specified kit components, lubricate correctly, bleed, and perform a functional check A rebuild kit can reduce component replacement when the original caliper housing remains structurally sound
Replacement instead of rebuilding Cracked housing, severely pitted bore, damaged mounting area, or piston seizure that cannot be corrected Advanced corrosion, impact damage, overheating, or wear beyond service limits Unresolved leakage, recurring drag, unstable braking, or unsafe component integrity Critical Replace the complete caliper or the affected assembly with a correctly specified service part A seal-only rebuild is not appropriate when the caliper body, bore, piston, or mounting structure is damaged

Note: Inspection methods, dimensional limits, brake-fluid specifications, and replacement procedures must follow the vehicle manufacturer’s service information.

Choosing EPDM Seals for DOT 3 and DOT 4 Brake Fluids

Why Choose a Brake Caliper Rebuild Kit?

A brake caliper rebuild kit can restore sealing performance without replacing the entire caliper. The seal material matters most. EPDM is designed for glycol-based brake fluids, including DOT 3 and DOT 4. It tolerates the heat and pressure found in ordinary hydraulic braking systems. It also resists swelling when used with the correct fluid.

Do not expose EPDM seals to petroleum oil, mineral oil, or grease. These substances can damage the rubber and cause leaks.

In workshop practice, I inspect the piston surface, seal groove, and caliper bore before installing new parts. Even a small rust spot can cut a fresh seal. The bore should feel smooth, not sharp or deeply pitted. Clean brake fluid and lint-free materials help prevent contamination.

A new dust boot is important too. It keeps water and road grit away from the piston.

Small details matter.

I once treated a sticky piston as a simple seal problem. It was not. Corrosion inside the bore caused uneven pad wear, and the repair needed more inspection than expected. That experience still influences my process.

Always match the kit to the caliper design and the vehicle manufacturer’s specifications. Use only the recommended DOT 3 or DOT 4 fluid. Never mix unknown fluids during a rebuild.

Bleeding the system carefully removes trapped air, although it is easy to rush this step. Even a firm pedal can hide a small issue.

FMVSS 116 Data: DOT 3 Boils at 205°C; DOT 4 at 230°C

Why Choose a Brake Caliper Rebuild Kit?

FMVSS 116 lists minimum dry boiling points for brake fluids. DOT 3 boils at 205°C while DOT 4 reaches 230°C. That 25°C difference matters during repeated braking, mountain driving, or heavy vehicle loads. However, boiling point is not the whole story. Moisture lowers fluid performance over time, and heat can expose weak caliper seals.

A rebuild kit replaces worn seals, dust boots, and sometimes guide components. It can restore smooth piston movement without replacing the entire caliper. During inspection, look for a swollen seal, rusty piston edges, or uneven pad wear. These small details often explain a dragging brake. The repair should include fresh, compatible fluid and careful bleeding.

A rebuild is not always the best answer. Deep piston corrosion or damaged bores may require replacement. I have also seen clean-looking calipers hide hardened seals. That mistake is easy to make. After assembly, check for leaks, firm pedal pressure, and even wheel release. Follow the vehicle service manual, because fluid specifications and bleeding procedures can differ. A higher DOT rating alone does not repair neglected hardware or guarantee better braking.

Rebuilding Correctly: Bore Cleaning, Lubrication, Bleeding, and Testing

Why Choose a Brake Caliper Rebuild Kit?

A brake caliper rebuild kit can restore reliable braking without replacing the entire assembly. The real work begins with careful disassembly and bore inspection. Remove corrosion, old seal material, and brake dust from the bore. Use a suitable cleaner and a lint-free cloth. Avoid scratching the metal surface. A damaged bore may need professional evaluation, not a new seal. I have learned that a clean-looking bore can still hide rough edges.

Lubricate the new seals with the specified brake fluid or approved assembly lubricant. Never use petroleum-based grease near brake seals. Install each seal evenly, then fit the piston without forcing it. After refitting the caliper, bleed the system until the fluid appears clear and air-free. Keep the reservoir from running dry. A firm pedal is important, but it is not the only test. Check for leaks, uneven pad movement, and abnormal piston retraction. Perform a controlled test in a safe area. Recheck the fittings afterward.

Tips: Keep removed parts in order. Photograph difficult steps. Use clean gloves. Do not reuse damaged hardware. If the pedal remains soft, stop and inspect the system again. Bleeding can feel complete when air is still trapped. That mistake is easy to make. Follow the kit instructions and vehicle service data, because seal sizes, fluid types, and bleeding methods can vary.

Brake Fluid Boiling-Point Standards

Correct caliper rebuilding includes cleaning the bore, lubricating compatible seals, bleeding air from the hydraulic system, and testing for leaks. The chart compares the minimum dry and wet boiling-point requirements for common DOT brake-fluid classifications under FMVSS No. 116. Wet boiling points are especially relevant after fluid absorbs moisture over time.

FAQS

When is a brake caliper rebuild kit useful?

It helps when the caliper housing remains sound. Kits usually include seals, dust boots, and retaining parts.

What indicates a damaged caliper pressure seal?

Brake fluid around the piston often indicates seal failure. Even a small leak deserves immediate inspection.

How can a torn dust boot affect braking?

Water and road grit can enter through the tear. Corrosion may develop beneath an apparently clean boot.

Which piston conditions make rebuilding unreliable?

Reject pistons with deep pitting, flaking metal, or sharp corrosion. A light mark can still cause later leakage.

What are common signs of brake drag?

One wheel may feel unusually hot after a short drive. The vehicle might pull sideways or use more fuel.

Can a normal brake pedal hide caliper problems?

Yes. A normal pedal does not rule out a sticking piston or uneven pad wear.

Which seals suit DOT 3 and DOT 4 brake fluids?

EPDM seals suit these glycol-based fluids. Keep them away from petroleum oil, mineral oil, and grease.

When should a caliper be replaced instead of rebuilt?

Replacement may be safer with deep bore corrosion or severe piston damage. Professional judgment still matters.

Why do DOT 3 and DOT 4 boiling points matter?

DOT 3 has a 205°C dry boiling point. DOT 4 reaches 230°C. Moisture reduces performance over time.

What should be checked after rebuilding a caliper?

Check for leaks, firm pedal pressure, smooth piston movement, and even wheel release. I once rushed bleeding and missed trapped air.

Conclusion

A Brake Caliper Rebuild Kit provides the essential components needed to restore braking performance without replacing the entire caliper. Typically, it includes replacement seals, dust boots, retaining rings, and related hardware. These parts help address common problems such as seal failure, piston corrosion, fluid leakage, and brake drag. Careful inspection is important because worn seals or damaged pistons can prevent the caliper from releasing properly and may cause uneven pad wear, overheating, or reduced braking efficiency.

For reliable results, EPDM seals should be selected for systems using DOT 3 or DOT 4 brake fluid. Under FMVSS 116 data, DOT 3 brake fluid has a boiling point of approximately 205°C, while DOT 4 reaches about 230°C. During rebuilding, the caliper bore must be thoroughly cleaned and checked for corrosion, compatible lubricant should be applied, and all seals must be installed correctly. The system should then be bled to remove air and tested for leaks, smooth piston movement, and consistent braking performance.

Aria

Aria

Aria is a dedicated marketing professional with a deep passion for innovative strategies and a keen understanding of our company's product offerings. With a wealth of experience in the industry, Aria excels at crafting engaging content that highlights the unique features and benefits of our......